Showing posts with label Embossing Folder
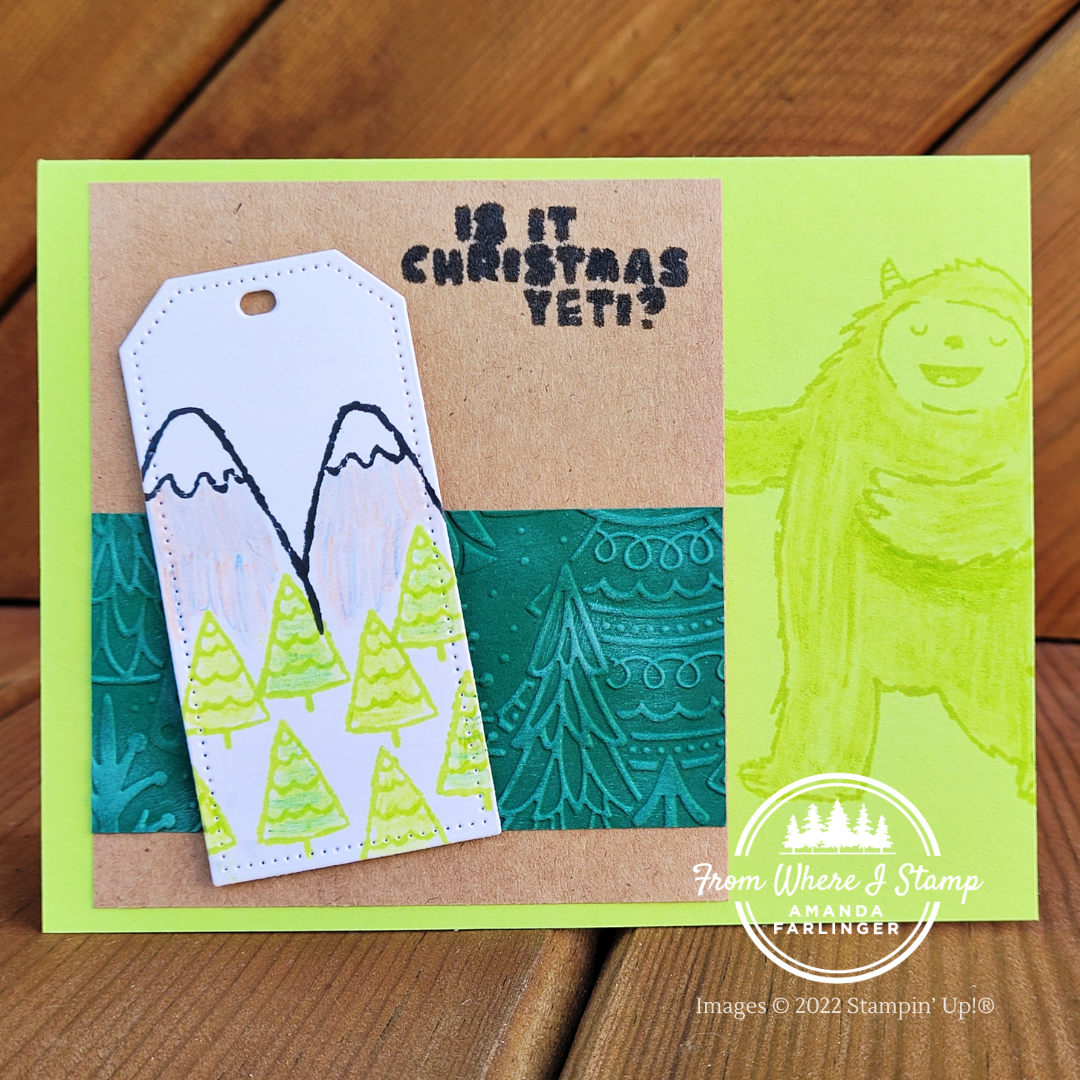
July is World Watercolour Month. I love to watercolour so this is a great excuse to show you some tips and tricks to create a Yeti to Party Christmas card using the Watercolour Pencils. Today's card uses the Yeti to Party stamp set. It's adorable & perfect for birthdays and Christmas!
A great person should receive a puny card on their birthday, right? Along with this fun colour combo of Parakeet Party, Tahitian Tide and Mango Melody it's a fun way to send birthday wishes. The He's All That stamp set and All That dies paired with the Hive 3D embossing folder were used to create this card. And if you scroll down you'll find a list of products with links to my online store to purchase. I'm loving the All That dies for the label and the flags dies, there are many uses for these dies not just to coordinate with the stamp set but they will work with many other stamp sets as well. 
Such lovely sentiments in the Penguin Place stamp set. This card I've used the "To the coolest friend ever" stamp but instead of stamping it as one piece I've split it up onto 2 lines. There are a few ways you can do that: use a Stampin' Write Marker to colour the section of words you want to stamp each time, cut apart the stamp to create 2 pieces, or you could use a sticky note to mask words that you don't want to touch the ink pad then remove the sticky note and stamp. Have you tried any of these techniques?

Hello! In today's Pretty Cards & Paper November blog hop you will see projects made with the Peaceful Place designer series paper. 
The gorgeous metallic accents in the Peaceful Place specialty designer series paper will help your projects pop! Included in this 12" x 12" pack of paper are 12 sheets of patterned paper: 2 each of 6 double-sided designs. One side of each has some metallic accents such as falling snow or woodgrain. Although this paper is monochromatic including Basic Black, Basic Gray, Smoky Slate you could colour in the sheets to change the look or stamp on the white portions.

Hello and welcome to my blog in this month's Colour Combo Blog Hop. Our projects for this blog hop use Gray Granite, Bermuda Bay and Gorgeous Grape.
Have you tried the Painted Texture 3D embossing folder before? It was available in the Jan-Jun Mini Catalogue and has carried over to the Annual Catalogue. I went digging through my embossing folders yesterday wondering what one I should use. It was hard to pick between the Painted Textured and the Tasteful Textile embossing folders. The best thing to do when you cannot chose between which embossing folder to use is to make a sample of both in the colour you will use. Then you can put the embossed cardstock down and place the items (without gluing them down) over top to see which one you prefer. Add the piece you don't use to your stash so that it's ready to go or make a 2nd card using it while you have all the items out. Then you'll have a few cards ready to send out for the time when you need it!

Inside the Annual Catalogue you can find the Holidays Section starting on page 88. The Tidings of Christmas suite uses the traditional colours I like to use for Christmas: greens and red. There is a coordinating stamp set & die bundle that is designed to work with the Tidings of Christmas designer series paper. But you could use any Christmas or Holiday themed stamp set with it. I've used the Season's Blessing stamp set and now the Perfectly Plaid stamp set.

On Saturday I participated in an online event where a fellow Canadian demonstrator hosted an online training and creative session. This was one of the cards she designed for us to create using stamps, dies and designer series paper from the Plentiful Plants suite. It's fun to gather with other demonstrators virtually or when there were in person events. The community that enjoys being creative and loves Stampin' Up! products is what I enjoy the most about events and meeting other demonstrators. It's one way I can feel connected and part of something bigger than me. Knowing that there is someone else out there that enjoys the same things I do is a great comfort. 

I love the textures in the Tasteful Touches stamp set. There is lots of detail with the images and this stamp set has some great sentiments as well. The hello is part of a larger sentiment in the Tasteful Touches stamp set. It was inked up using a Basic Black Stampin' Write Marker then stamped onto a piece of Sahara Sand cardstock.

Product List - click on any of the pictures below to be taken to my online store to pick up the supplies you need to recreate this project.

Thank you for stopping by! ~ Amanda 

If you love great deals, our Last-Chance Products Sale is the perfect time to shop. You’ll get deep discounts on your favorite products from the 2020–2021 Annual Catalog. Many items will sell out fast, so don’t delay. Some items have sold out. See all the deals here: https://www.stampinup.ca/categories/sales-specials/last-chance-products-sale?dbwsdemoid=2157916
May's Paper Pumpkin is called Batter Up! This kit contains enough supplies to create 9 cards—3 each of 3 designs—and coordinating envelopes with the theme of baseball. The all-inclusive kit includes printed card bases, die-cut paper pieces, embellishments, adhesive, and more! To receive this kit you will need to subscribe for May's kit by May 10th by visiting this link https://www.paperpumpkin.com/en-ca/sign-up/?demoid=2157916


With the retiring list posted recently I went through my stamp collection. One of my favourite things is purchasing new stamps to play with but then I forgot about the awesome stamps I have in my collection already! Do you get that way too? This week I'll be sharing projects using some of my favourite retiring products. Today's card features the Country Home stamp set and the Tin Tile 3D Embossing folder.

Each week I will share a video on how to create a project. This video will be available on my YouTube channel and shared in a blog post with more details about that project. See today's video below or you can watch it on my YouTube channel:

Product List

Thank you for stopping by! ~ Amanda 

So Cool by Paper Pumpkin is the fresh, versatile, and fun taste of summer that stampers of all ages will want to savor. What makes the April Paper Pumpkin kit So Cool? This vivid, summer-inspired kit includes two full sticker sheets and all supplies needed to make 12 fun-shaped cards with matching envelopes. But, even more cool: it’s the first Paper Pumpkin kit designed with kids in mind! 🥝 🍓 🍉 Subscribe for April's kit by Apr 10th by visiting this link https://www.paperpumpkin.com/en-ca/sign-up/?demoid=2157916
If you love great deals, our Last-Chance Products Sale is the perfect time to shop. You’ll get deep discounts on your favorite products from the 2020–2021 Annual Catalog. Many items will sell out fast, so don’t delay. Some items have sold out. See all the deals here: https://www.stampinup.ca/categories/sales-specials/last-chance-products-sale?dbwsdemoid=2157916

Happy December 7th! Today is Kylie's Monthly International blog highlights where demonstrators from all over the world share their project using the theme of Thank You. You can vote for your top 5 favourites on Kylie's blog, I hope you enjoy my card and vote for me!
My upline Lisa gave us a colour challenge awhile back to use Rococo Rose, Rich Razzleberry and Petal Pink to create a project. While I'm not a fan of pink (Team Purple here!) I have been challenging myself to create with colours I wouldn't normally. First I stamped different sized snowflakes and my chosen sentiment from the Snowflake Wishes stamp set onto Whisper White cardstock. Originally the white stamped piece was going to be the top part of the card but then I remembered there was Champagne Foil sheets sitting in my drawer waiting to be used. The Champagne foil sheet is cut to 4" x 5.25", then run through the Stampin' Cut & Emboss machine first with a die from the Stitched Rectangles dies and then with the Winter Snow embossing folder. The whole Champagne piece is popped up with Stampin' Dimensionals with the white stamped piece glued to the Gray Granite card base. 
Tip: Take a piece of printer paper: cut in half so it will fit into the die cut machine (8.5" x 5.5"), then when putting your sandwich together place the printer paper over the foil/die sheet before placing the top plate on. This will protect the foil from imprinting from the top plate.
If you have a moment please vote for my card and check out all the other great projects! Click here to vote. The top 10 winners of this vote will participate in an International Blog Hop later this month.

Product List
Thank you for stopping by! ~ Amanda 
 
December's cute and cuddly Beary Comforting 🧸 Paper Pumpkin Kit is designed to uplift your loved ones! With the help of this bear-themed kit, you can create 12 unbearably cute cards featuring warm and fuzzy friends, sweet stamps, and meaningful messages. Sign up for this adorable kit by Dec 10th: https://www.paperpumpkin.com/en-ca/sign-up/?demoid=2157916
© From Where I Stamp by Amanda Farlinger · THEME BY WATDESIGNEXPRESS